Programming - Metering VST/AU Plugin
Written on November 30th, 2023 by Alex Zahn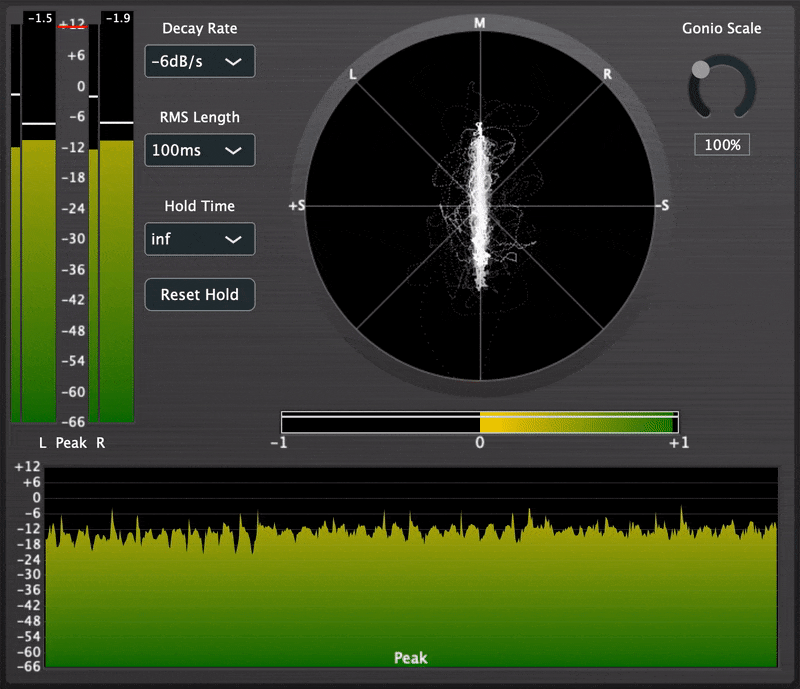
The Idea
This post discusses some of the learning lessons and challenges I faced while developing a simple metering audio plugin. The goal of this project was not to develop any revolutionary new audio-processing methods or the world’s greatest plugin, but just to go through the process from start to finish of creating a VST plugin with a reasonably achievable feature-set, practice creating an audio tool with both UX and performance in mind, and learn the necessary lessons and skills along the way. If you’re reading this post as someone aspiring to do the same, I hope it offers some amount of clarity and guidance.
Until last year, I’d done plenty of software work and plenty of audio production work, but I’d still yet to really connect the two worlds of production/design and engineering. Having found out that most plugins are written in C++, I first had to teach myself C++ fundamentals from online resources. (I’d learned some C, VHDL, and Assembly programming in college, but due to the nature of an electrical engineering degree, it was all relatively hardware-focused, with no emphasis on OOP or app-level development. With that said, some of that low-level awareness was certainly helpful here). I then learned about the JUCE framework, and did a 3-Band EQ coding tutorial to get more comfortable with it, before tackling this metering plugin project.
The Features
The features of the plugin include…
- Peak & RMS Level Meters
- Peak Histogram
- Stereo Correlation Meter
- Goniometer
…as well as the following controls…
- Level Meter Peak Tick Mark Hold Time
- Level Meter Peak Tick Mark Decay Rate
- Level Meter RMS Length
- Adjustable Target dB Threshold
- Goniometer Scale
I also added in some quality of life things, that I wouldn’t go so far as to call “features”, but are nice nonetheless, like clicking the histogram to refresh, hovering to view dB level at the mouse cursor location, and double-clicking the threshold and goniometer scale sliders to reset them to default values.
I won’t do a thorough walkthrough of every aspect of the plugin in this post, but I will offer a general overview, with some special attention to the parts that were my favorite to work on, along with some code snippets.
If you’d like to check out the source code in more depth, it’s publicly available on Github.
You can also watch a quick video demo here.
The Process
JUCE plugins by default are split into two main classes:
- The “PluginProcessor”, which handles the actual audio I/O and, well, processing.
- The “PluginEditor”, which handles the GUI.
Processor
The audio thread is a delicate beast. It needs to process blocks of audio data in real-time without getting held up in any way. A sample rate of 48 kHz with a buffer size of 128 samples leaves only a window of 2.66 ms for all your audio processing! Take longer than that, and you start getting underruns, which manifest as audible clicks and pops.
For this reason, this metering plugin’s Processor class copies the incoming audio into a FIFO buffer, which the Editor pulls from and copies into its own audio buffer, which it uses to calculate the graphical representation. Having the Editor class access the actual audio buffer directly would result in a plethora of issues, like blocking the audio thread or data corruption from both threads trying to read/write from the audio buffer simultaneously.
The Processor class has two main functions:
- prepareToPlay(), which gets the processor ready to process blocks of audio data before playback begins.
- processBlock(), which receives a reference to a block of audio data and processes it.
In this metering plugin, the prepareToPlay() function simply prepares the FIFO for action, taking into account the expected maximum number of samples per block of audio data, and the number of output channels. (The sample rate is part of the function signature, but it’s not used here).
void PFM10AudioProcessor::prepareToPlay (__attribute__((unused)) double sampleRate, int samplesPerBlock)
{
    audioBufferFifo.prepare(samplesPerBlock, getTotalNumOutputChannels());
}
Because this plugin only performs metering, there’s not really any audio processing going on between the input and output (other than some math to calculate the graphical representation, which runs on a separate thread. I’ll get to that later), so the data in the audio buffer itself is left as is. All the plugin does when handed a block of audio samples is copy them into the FIFO for the Editor to read.
void PFM10AudioProcessor::processBlock (juce::AudioBuffer<float>& buffer, __attribute__((unused)) juce::MidiBuffer& midiMessages)
{
    juce::ScopedNoDenormals noDenormals;
    auto totalNumInputChannels  = getTotalNumInputChannels();
    auto totalNumOutputChannels = getTotalNumOutputChannels();

    // In case we have more outputs than inputs, this code clears any output
    // channels that didn't contain input data, (because these aren't
    // guaranteed to be empty - they may contain garbage).
    // This is here to avoid people getting screaming feedback
    // when they first compile a plugin, but obviously you don't need to keep
    // this code if your algorithm always overwrites all the output channels.
    for (auto i = totalNumInputChannels; i < totalNumOutputChannels; ++i)
        buffer.clear (i, 0, buffer.getNumSamples());

    audioBufferFifo.push(buffer);
}
Okay, I lied. There’s more going on in the Processor class than that, like initializing a JUCE Value Tree to hold parameter values, and functions to save/load state when the plugin is closed/opened. Here are those, for the curious:
void PFM10AudioProcessor::getStateInformation (juce::MemoryBlock& destData)
{
    // You should use this method to store your parameters in the memory block.
    // You could do that either as raw data, or use the XML or ValueTree classes
    // as intermediaries to make it easy to save and load complex data.

    juce::MemoryOutputStream outputStream = juce::MemoryOutputStream(destData, false);

    valueTree.writeToStream(outputStream);
}

void PFM10AudioProcessor::setStateInformation (const void* data, int sizeInBytes)
{
    // You should use this method to restore your parameters from this memory block,
    // whose contents will have been created by the getStateInformation() call.

    juce::ValueTree loadedTree = juce::ValueTree::readFromData(data, static_cast<size_t>(sizeInBytes));

    if (loadedTree.isValid() && hasNeededProperties(loadedTree))
    {
        valueTree.copyPropertiesAndChildrenFrom(loadedTree, nullptr);
    }
    else
    {
        // Do nothing. Value tree was initialized in the constructor with default values. Don't overwrite it.
    }
}
Editor (GUI)
The Editor class has a lot going on, so I won’t dive too deep into it in this post. The long and short of it is that the Editor class pulls audio data from the FIFO (at screen frame rate), processes it as necessary for the graphics on a separate updater thread, paints the graphical components on-screen, and handles UI as necessary to adjust the processing or graphics.
While it isn’t the most aesthetically pleasing component, the stereo correlation meter was the most fun mathematically. Prior to this project, I’d worked with stereo width often in music production and sound design settings, but I hadn’t really taken a look under the hood. For those unaware, a stereo correlation meter (“phase correlation meter”) measures the correlation between the left and right channels, with 1 representing 100% positive correlation (i.e. mono), 0 representing no correlation (the left and right channels are independent), and -1 representing 100% negative correlation (i.e. the left and right channel carry the same signal, 180° out of phase from each other). This is helpful to know as an audio designer or mix engineer; phase correlation approaching -1 can cause drastic changes to the sound when the stereo mix is summed to mono, or even just between listening systems with varying speaker configurations. This video illustrates nicely what in-phase and out-of-phase stereo audio sounds like on its own.
There is a great StackExchange post explaining one way to calculate stereo correlation (and another good explanation with a nifty block diagram for my fellow hardware nerds). Take a look at the numerator and denominator of the equation, keeping in mind that the audio samples range from -1 to 1. The numerator and denominator are effectively the same thing, just with the sign (polarity) removed from the denominator by way of the squaring. The sign of the resulting correlation is a result of solely the product in the numerator. For example, left and right samples of 1 and 1 respectively, or -1 and -1, would both result in a correlation ratio of 1, while left and right samples of 1 and -1 would result in a correlation ratio of -1. A low-pass filter with rectangular windowing is applied to each of the terms to effectively get a moving average.
\[ Correlation = \frac{ LPF(Left\ *\ Right) }{ \sqrt{LPF(Left^2)\ *\ LPF(Right^2)} } \]
If I implement a correlation meter in the future, I may opt to make the moving average period user-adjustable, but in this case I stuck with a fixed period. After some experimentation, I found that a low pass filter cutoff frequency of 10 Hz (resulting in a period of 100 ms) felt the most appropriate. I feed the result into a slower averager as well, to get both a “fast” and “slow” average correlation meter. The correlation meter component’s constructor body looks like this:
using FilterDesign = juce::dsp::FilterDesign<float>;
using WindowingMethod = juce::dsp::WindowingFunction<float>::WindowingMethod;

FilterDesign::FIRCoefficientsPtr coefficientsPtr( FilterDesign::designFIRLowpassWindowMethod(10.f, //frequency
                                                                                             _sampleRate,
                                                                                             1, //order
                                                                                             WindowingMethod::rectangular) );

for (juce::dsp::FIR::Filter<float> &filter : filters)
{
    filter = juce::dsp::FIR::Filter<float>(coefficientsPtr);
}
The body of the correlation meter’s update function simply runs each sample of the Editor’s audio buffer through the equation, pushing the result into the averagers, and checking for NaN and Inf values in case anything wonky passes through:
int numSamples = buffer.getNumSamples();

for (int iSample = 0; iSample < numSamples; ++iSample)
{
    float leftSample = buffer.getSample(0, iSample);
    float rightSample = buffer.getSample(1, iSample);

    float numerator = filters[0].processSample( leftSample * rightSample );
    float denominator = sqrt( filters[1].processSample(juce::square(leftSample))
                            * filters[2].processSample(juce::square(rightSample)) );
    float c = numerator / denominator;

    if ( std::isnan(c) || std::isinf(c) )
    {
        slowAverager.add(0);
        fastAverager.add(0);
    }
    else
    {
        slowAverager.add(c);
        fastAverager.add(c);
    }
}
Profiling
My goal with the first pass of development was to get the basic functionality working, keeping performance in mind but not obsessively. Improved aesthetics and performance optimization could be focused on after I was sure each component worked, took an approach that made sense in the long run, and tied together with the GUI controls safely and effectively. Sudara’s JUCE module wrapper of the Perfetto tracing tool was an enormous help at this stage. Using Perfetto to profile, I was able to track down which functions were the heaviest hitters on performance, so I could focus on those first.

For example, I found that the text at the top of the level meters was taking a significant chunk of time to render each frame (text rendering is slow, who knew). I was able to buffer the text to an image that could be redrawn in subsequent frames if the dB value to be displayed had not changed.
Profiling in this way also helped me determine that my initial approach to drawing the goniometer on screen (using JUCE’s built-in graphics Path class) was super heavy. Stroking a path on-screen every frame, not to mention storing the pixel coordinates for every mid-side-encoded audio sample as a vertex of the path, and the overhead of the Path class itself, just took a ton of time and memory. I ultimately ended up switching to a point-cloud approach. Not only does it look nice, but it allowed me to handle almost all of the graphical processing on a separate updater thread and keep track of a lot less data. Rather than pass a Path object with a ton of vertexes around, I keep one RGBA image. The updater thread converts each audio sample to mid-side values, maps those to x-y coordinates, and marks the individual pixel white in that image data. The “paint” function then just has to draw the image on screen. This, combined with offloading the mid-side mapping to a separate updater thread, dropped the average time spent by the message/UI thread drawing the goniometer from 150 microseconds to 10 microseconds. This performance boost also allowed me breathing room to add in a nice “fading-out” effect, something I tried to accomplish with the Path implementation in a few different ways, and ultimately couldn’t pull off with reasonable performance. All I had to do was slightly decrease the image alphas each frame.
The aforementioned offloading of some of the heavier processing to a separate thread helped keep pressure off the message/UI thread as well, but introduced some data race conditions. Stepping through breakpoints in my IDE and using TSAN helped me identify where race conditions were occurring. I considered a double-buffer approach to some of these issues but ultimately got away just fine with a few mutexes in the necessary places.
In the end, I was able to catch a few places where occasional float overflow, NaN, and Inf errors were happening, and drop the time spent by my plugin occupying the message/UI thread from 1.4 ms/frame down to 0.24 ms/frame.
Wow, you really made it this far?
Thanks so much for reading my retrospective ramblings. Developing this plugin was a lot of fun and such a valuable experience. Shouts to MatKatMusic for the mentorship in the early stages. Throughout the process, I learned a ton about working with audio buffers, multi-threading, profiling, and C++ in general. I’m looking forward to applying the skills and experience I gained to another audio plugin, and taking on a bigger challenge! Maybe a sort of utility plugin to perform automatic tone-matching between vocal performances recorded with different mics / distance from the mic / rooms… ML is so hot right now.
If you have any comments or questions about anything mentioned in this post or otherwise, feel free to email me or connect on any of the social networks linked below. I’d love to hear from you. Thanks again.